Using the AndySnap Screen Capture Utility
Running AndySnap
Once you have installed AndySnap onto your computer, you will need to run AndySnap before you can take any pictures of your computer.
You can run the program by going to your Start Menu > Programs > AndySnap. AndySnap will stay in the background while you run your other applications.
Activating A Screen Capture
When you want to take a picture of a part of the computer screen, you simply need to press the Print Screen button on your keyboard
(also labelled as PrtScr on some keyboards). AndySnap will then start the capture process with what you see on the screen.
You can also take a snap shot by pressing the "Snap Now!" button on the AndySnap configuration screen.
If you are taking a screen capture of mouse activated items like drop-down menus, you will need to use the Print Screen button on your
keyboard to successfully capture all the items on the screen.
Specifying What Areas Of The Screen To Capture
When you activate a screen capture, AndySnap will highlight to you what areas of the screen it will save to the file. Those areas of
the screen that are not going to be captured will be shaded. AndySnap remembers the last 20 capture regions that you made, and it will
start with the latest one.
You can move and change the size of the capture box in many ways:
Drag the edges or the corners of the highlight box
Click and drag in the shaded areas to create a new highlight box
Press the A key to highlight the current Active window
Press the D key to highlight the entire Desktop
Press the number 1 to highlight all of your primary monitor
Press the number 2 to highlight all of monitor 2 (when using multiple monitors)
Press the number 3 to highlight all of monitor 3 (when using multiple monitors)
Press the number 4 to highlight all of monitor 4 (when using multiple monitors)
Use the arrow keys to cycle through previous capture regions. (note that when you first run AndySnap there are no previous
regions to cycle through, so the arrow keys will not do anything at that point)
Taking The Snap Shot (saving to your hard drive)
When you are satisfied with the capture area, just press the SPACE BAR or the ENTER key. AndySnap will save the region to your
specified folder and give you a brief message telling you that the capture was successful.
If for some reason AndySnap was unable to save the capture to the specified folder (maybe you moved it, or renamed it) the capture
message will be red and will stay on the screen for a slightly longer period of time.
What Image Type Should I Save It As ? JPG ? PNG ? ...
AndySnap can save your images in a variety of different file formats. What file format you choose to use depends on (i) what you are
taking a picture of, and (ii) what you are going to do with it.
Here are comments on a few of the formats :
PNG
- offers good compression (small file size) and good quality for most computer images and applications. It can support true colour
graphics and is open source (meaning it doesn't have the patent issues that GIF has) .
JPG
- Choose this for screen captures of photos or images where there is a lot of subtle variations in colour. Jpegs do not reproduce
thin hard lines or simple graphics very well.(for example, text and cartoons will have "halos" and / or blotches around them).
BMP
- a bit-for-bit capture of the screen. This takes the largest amount of hard drive space.
GIF
- GIFs have a small file size, but a limited colour palette (only 256 colours). Use only when there are a limited number of colours
on the screen, like simple block graphics or text.
AndySnap also supports the TIF format.
File Naming
Once you make a screen capture, AndySnap will automatically save it in the folder specified on the main configuration screen.
The name of the file will be the prefix that you specify, followed by a sequential number, and then the file type.
For example, if you tell AndySnap to save JPG images with a prefix Steps_To_Clean_Inbox_ , the first screen capture
will have the filename Steps_To_Clean_Inbox_001. The next screen capture that you make will then have the filename Steps_To_Clean_Inbox_002, and so on.
You can change the prefix to whatever you want, as long as it conforms to the standard Windows file name rules (cannot contain
any of the following characters: \ / : * ? " < > | )
Quick File Name Override
If you are in the middle of a capture stream and need to save an image to something different than your current filename
prefix, you can temporarily override the capture filename. To do this, simply press the F key at any time while
you are defining the area of the screen to capture, and a file name dialog will pop-up:
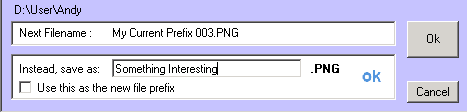
The top of the box shows what the file name will be if you don't override (My Current Prefix 001). Type the
file name that you want in the text box and press OK. When you complete your capture, AndySnap will use that file name.
(note that you cannot change the file type here, just the filename.)
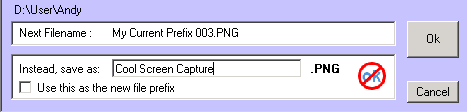
AndySnap won't let you accidentally choose a name of an already existing file. If you do, AndySnap will tell you right away
in the override dialog by showing a red circle over the "file name ok", as shown below:
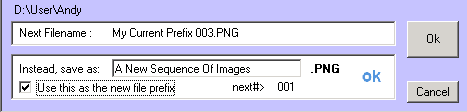
If you are in mid-capture and want to change the name of the file prefix, you can also do that using the override dialog. Just type
your desired new prefix in the text box and then check the "Use This As The New File Prefix" box, as shown below:
How can I find out what the next file name will be ?
There are a few ways to quickly find out the current file prefix, and what the next sequence number will be.
Check the main configuration screen
Move your mouse over the mini-splash screen during program start-up.
Right click the AndySnap icon in the system tray (the next filename is shown at the top of the menu)
Press F during capture (and then press Cancel or hit ESC if you don't want to file name override)
Viewing Capture Files
The AndySnap main configuration screen has an image viewer built-in that will show you all of the image files (of the
type specified) in the current target directory. The preview of the image will be reduced in size to fit in the viewer. You can
enlarge the size of the viewer by dragging the sides or corners of the main configuration screen. The viewer will resize along with
it. If the viewer is larger than the image it is previewing, the viewer will place a #424242 border around the image.
Deleting Capture Files
You can delete image files from the viewer. Just click on the file name so that the viewer shows a preview of the image.
Right-clicking on the preview image will give you a pop-up menu. Select "Delete This Image". After a confirmation dialog, AndySnap
will delete the image and update the file listing.
I've Lost the Main Program Window !
Since AndySnap does not appear in the main Taskbar, it can sometimes get lost amongst the windows. Just simply double-
click the AndySnap icon in the system tray (or right-click it and select Open) and the main configuration screen will move itself to the center.
Also, if you have just disconnected from a multiple monitor session, the AndySnap window may have been 'left' on one of the
monitors you disconnected. Again, just simply double-click the AndySnap icon in the system tray (or right-click it and select
open) and AndySnap will move to an active monitor.
Can I Change the Capture Sound ?
Sure ! You can find the current sound files in the Program Files\AndySnap folder. Your new sounds must be WAV files.
To use them, simply rename your WAV files to either capture.wav or error.wav, depending on what sound you wish to change.
I'm still having problems...
You can contact us for technical support at
 Please specify what version of AndySnap you
are running (it's in the bottom right corner of the configuration screen). Priority goes to those who donate, of course ! :-) Please specify what version of AndySnap you
are running (it's in the bottom right corner of the configuration screen). Priority goes to those who donate, of course ! :-)
Hey - This Is A Handy Little Program !
I like to think so ! Please show your support by making a donation !
|
|